Navigation
Install the app
How to install the app on iOS
Follow along with the video below to see how to install our site as a web app on your home screen.

Note: This feature currently requires accessing the site using the built-in Safari browser.
More options
You are using an out of date browser. It may not display this or other websites correctly.
You should upgrade or use an alternative browser.
You should upgrade or use an alternative browser.
93 Swift Chevy Turbo
- Thread starter GT4LIFE
- Start date
That is great news.
Enjoy your work
Enjoy your work
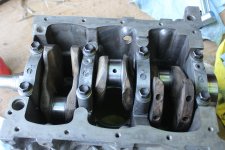
Updates:
Attachments
-
 Block 2 w ARP head Studs.jpg478.5 KB · Views: 8
 -
 Block 3.jpg490.8 KB · Views: 5
 -
 Block Close Up w Check Valve.jpg566.4 KB · Views: 4
 -
 Block w ARP studs.jpg462.8 KB · Views: 4
 -
 Block with Bearings 2.jpg603.9 KB · Views: 4
 -
 Block with Bearings.jpg642.2 KB · Views: 4
 -
 Bottom End Complete 2.jpg577 KB · Views: 4
 -
 Bottom w Oil Pick Up Tube.jpg610.4 KB · Views: 5
 -
 Bottom End Complete.jpg610.4 KB · Views: 7
More Updates:
Attachments
-
 Clutch 1.jpg128.6 KB · Views: 6
 -
 Clutch 2.jpg115.8 KB · Views: 6
 -
 Clutch 3.jpg99.3 KB · Views: 5
 -
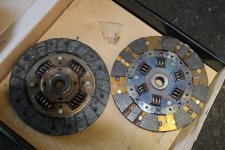 Clutch 5.jpg114 KB · Views: 4
 -
 Clutch 7.jpg133 KB · Views: 5
 -
 Driverside Front View.jpg209.7 KB · Views: 5
 -
 Crankshaft.jpg503.6 KB · Views: 5
 -
 Driverside View.jpg309.3 KB · Views: 5
 -
 engine bay 1.jpg125 KB · Views: 6
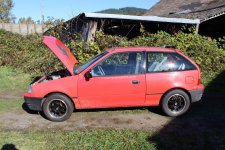
Even more updates:
Attachments
-
 Engine 1.jpg219.8 KB · Views: 7
 -
 engine bay 1.jpg125 KB · Views: 5
 -
 Engine bay 2.jpg123.7 KB · Views: 5
 -
 Engine bay 3.jpg99.5 KB · Views: 5
 -
 Engine Bay Driverside.jpg235.3 KB · Views: 5
 -
 Engine bay 6.jpg123.7 KB · Views: 5
 -
 Engine Bay Front.jpg213.9 KB · Views: 5
 -
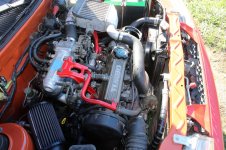 Engine Bay Passenger Side.jpg266.8 KB · Views: 5
 -
 Engine Installation 1.jpg115.4 KB · Views: 5
 -
 Engine Installation 2.jpg129 KB · Views: 8
I installed a rear sway bar with Energy Suspension poly bushings. I used a 1/2" plate aluminum on bottom and a 1/4" plate of aluminum on top on each sway bar bushing mount. I also pulled the rack and pinion and replaced inside and outside tie rods with new bellows. I cleaned up the rack, and greased.
I have been driving her for my daily for a bit. Steering is way better after doing new inside and outside tie rods. When I first put back on the rack I had reversed the bushing sleeve on the passenger side of the rack. I noticed right away that something wasn't right. Took it all back off and flipped it and she was good to go. I still need to replace front bushings and get a proper alignment since I got her as close as I could without the right equipment. I will also do new front suspension also before doing the alignment.
Finally getting back to some work on this one since I'm daily driver her for a while until I get transmission rebuilt in black GT. I bought a GT(i) silicone hose set knowing that it wasn't likely to fit unmodified. I ended up with a cheap work around for the top to make that one work. I had on hand a
I have a spare Gti metal joiner tube. It looks like I can use that to complete the rest of the bottom hose run. Some distant past owner put a radiator fluid heater in the end of the bottom hose. I might still use that as another joiner.

Dewhel Aluminum Black Water Temp Meter Temperature Gauge Joint Pipe Radiator Sensor Adaptor Clamps 28mm
(1.10"). It retails for $10 on amazon. The gt(i) silicone top radiator hose will be too short by about 3" when you use it on a T3 Firefly/Sprint turbo car. You use adapter and cut a little more then 2" off the back rear silicone hose. You will need two 1/2" stainless steel clamps for the adapter since the ones it comes with a cheap crap. You plug the adapter into the radiator end of the top hose clamp, and use the 2 1/2" to 3" silicone hose to go between the adapter and the radiator. This will also give you 1/8" npt port if you want to hook up a more reliable water temperature sensor. I chose not to run this in the black GT preferring to add another port onto the thermostat housing. However, it doesn't look bad on the T3, and for a little over $10 to get a working silicone hose it is a win!I have a spare Gti metal joiner tube. It looks like I can use that to complete the rest of the bottom hose run. Some distant past owner put a radiator fluid heater in the end of the bottom hose. I might still use that as another joiner.
blueturbofly
Well-known member
never had luck with those in-line rad hose heater. had one installed in the wifes t3 -it only got the area around it warm- it did not circulate the coolant like it is supposed to. the oem intake warmer , along with a aftermarket heated oil pan pad, worked better than the inline coolant heater.
plus it always had a coolant leak where it was spliced into the lower rad hose. no matter how tight the gear clamps were-
plus it always had a coolant leak where it was spliced into the lower rad hose. no matter how tight the gear clamps were-
I have no need for the heater and will likely take it out. However, the adapter above is leak free with the cheapest of clamps that I had on hand. I do believe I can use the remaining silicone hose set with the addition of the gt(i) 1" aluminum tube that mounts to the transmission to connect up the rest of coolant hoses for our g10(t) engines. Of course not too many people will have access to the 1" coolant hose. I will post up pictures when I try converting the rest of the system over.
I went ahead and order up new front KYB struts, wheel bearings, top mount bearings, strut bellows, control arms, and SuperPro bushings (they are in stock in the U.S. and are about the same price with free shipping). Front only. I will switch over to Energy Suspension sway bar bushings while I'm at it. I'm also switching out to a synthetic Royal Purple Synchro Mesh for all my vehicles. I'll let you guys know what I think of the the Royal Purple. I'm a huge fan of the hp street performance 10w40 motor oil.
blueturbofly
Well-known member
i tried royal purp in my wifes truck- low mileage newer f150- it started leaking oil from the rear main seal and front timing chain covers-switched back to mobile 1, and the leaks slowed to almost a stop-
the boys at work tried royal purp in their circle track cars-found they were using more oil than normal, and oil leaks, and the price is astronomical up here in canada.
they have their engines built by a local speed shop, so i doubt its the builders fault. one of the boys is prepping to drop his dynoed 345 hp 350 into his car-and all they run is synthetic jobber brand oil- i dont even know the brand-
but hey, different strokes for different folks-
I haven't had any leaks, but I'm also not using the 5w 30 royal purple. I'm using 10w-40 royal purple HPS Street Performance in the black turbo GT. It is more expensive at $9.99 U.S dollar per quart compared to Mobil One, but not that much more. I use Mobil One synthetic in the this red Swift and will continue to. When I just looked at Mobil One price from Amazon it was close to the same price at 54.99 per 6 quarts ($9.17). However I almost always buy Mobil One from Costco when it goes on sale which I think currently it runs for $36 for 6 quarts = $6 a quart which is the best price I can find for it (I do have to pick it up in store for that price). The black GT is a special case with both oil cooler, and larger turbo. I have been running nothing but Penzoil Synchromesh in the transmissions and I really think it is time to go synthetic for all my cases. If I don't like the RP I'll try Amosoil synchromesh next time.